
I’m pleased to talk to you today about assembling furniture, which can be both immensely enjoyable and rewarding once you get the hang of it. At first, it could seem a little intimidating. This article will show you how to put together furniture like an expert whether you’re moving into a new house, remodelling, or simply enjoying the notion of taking on some DIY home improvement chores.
So, let’s dive right in and start our conversation about how to assemble furniture, one step at a time.
- 1. Choosing the Right Tools
- 2. Optional Tools to Make Your Life Easier
- 3. Assembling Flat-Pack Furniture
- 4. Assembling Furniture with Hardware
- 5. Dealing with Cam Locks and Dowels
- 6. Proper Techniques for Secure Assembly
- 7. Furniture with Drawers and Slides
- 8. Securing Shelves and Panels
- 9. Assembling Complex Furniture
- 10. Handling Glass and Mirrors
- 11. Adjusting and Fine-Tuning
- 12. Troubleshooting and Common Issues
- 13. Safety Considerations
- 14. Caring for Your Assembled Furniture
- Wrapping Up
1. Choosing the Right Tools
First and foremost, you must have the appropriate tools available to you. Any effective furniture assembly job must start here. You wouldn’t go out on a journey without your reliable map or GPS, right? In the realm of assembling furniture, your tools serve as your compass.
Let’s go over the fundamental supplies you will need to begin going:
- Screwdrivers – You’ll want both Phillips and flathead screwdrivers. They’re your trusty companions for turning screws and securing various parts.
- Allen Wrenches or Hex Keys – These are a must for many furniture pieces, especially flat-pack items. Make sure you have a set of these in various sizes.
- Adjustable Wrench – An adjustable wrench can be a lifesaver, especially when you’re dealing with bed frames or any bolts and nuts.
- Hammer – This tool is perfect for tasks like tapping wooden dowels into place or making small adjustments without causing damage.
- Pliers – Pliers come in handy for gripping and turning small screws or bolts. They can also help you hold parts in place while you secure them.
- Tape Measure – You’ll need a tape measure to ensure parts are correctly spaced and aligned. This is especially important for things like drawer slides and handles.
- Level – To make sure your assembled furniture is stable and sits flat on the floor or against the wall. No wobbly bookshelves here!
- Rubber Mallet – This mallet is perfect for gently tapping parts into place without leaving a mark.
- Safety Goggles – Always wear safety goggles when working with tools to protect your eyes from any flying debris or accidental slips.
- Work Gloves – Protect your hands with work gloves, especially when dealing with sharp or rough materials.
That completes your fundamental toolset for assembling furniture. However, you could come across certain tools that are either essential or might make your life simpler, depending on the complexity of the furniture and the type of hardware used. Let’s start with these fundamentals before moving on to these other tools.
2. Optional Tools to Make Your Life Easier
Just like having a GPS with real-time traffic updates can save you from getting stuck in jams, some optional tools can significantly speed up your furniture assembly process. They can make things smoother and more efficient, so let’s explore them:
1. Cordless Screwdriver – A cordless screwdriver with interchangeable bits is your best friend when it comes to driving screws quickly, especially for larger pieces of furniture.
2. Electric Drill – For larger furniture items, an electric drill with a screwdriver bit can save you precious time. Just remember to set the torque correctly to avoid over-tightening and damaging the wood.
3. Cordless Jigsaw – If your assembly task involves making precise cuts in wood or other materials, a cordless jigsaw can be a great asset.
4. Clamps – These are your helping hands. Clamps can keep parts in place while you secure them, ensuring tight joints and no misalignments.
5. Magnetic Parts Tray – It’s a small but incredibly useful tool. A magnetic parts tray keeps screws and other small metal pieces from rolling away or getting lost. A real lifesaver.
6. Painter’s Tape – This versatile tape can serve as a makeshift ruler, create temporary labels, or even protect delicate surfaces from scratches or marks.
It’s crucial to keep in mind that these extra tools aren’t always required for every job. Your decision will be influenced by the particular requirements of the furniture you’re building and how comfortable you are using these tools.
It’s time to roll up your sleeves and start assembling furniture now that we’ve organised your toolbox. This will be divided into many parts, with the assembly of flat-pack furniture coming first.
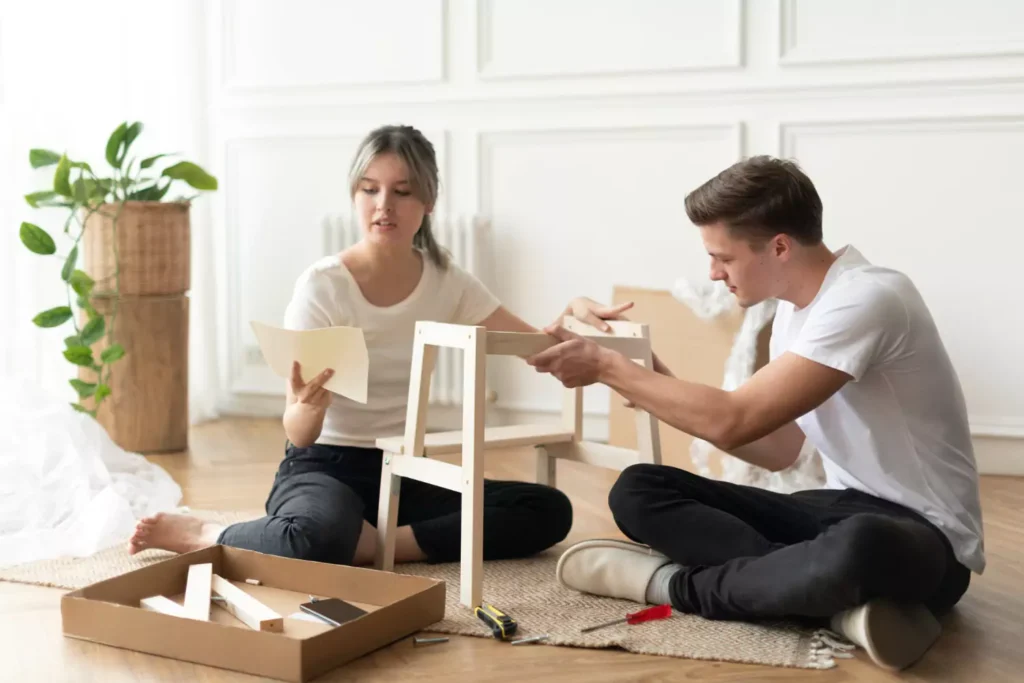
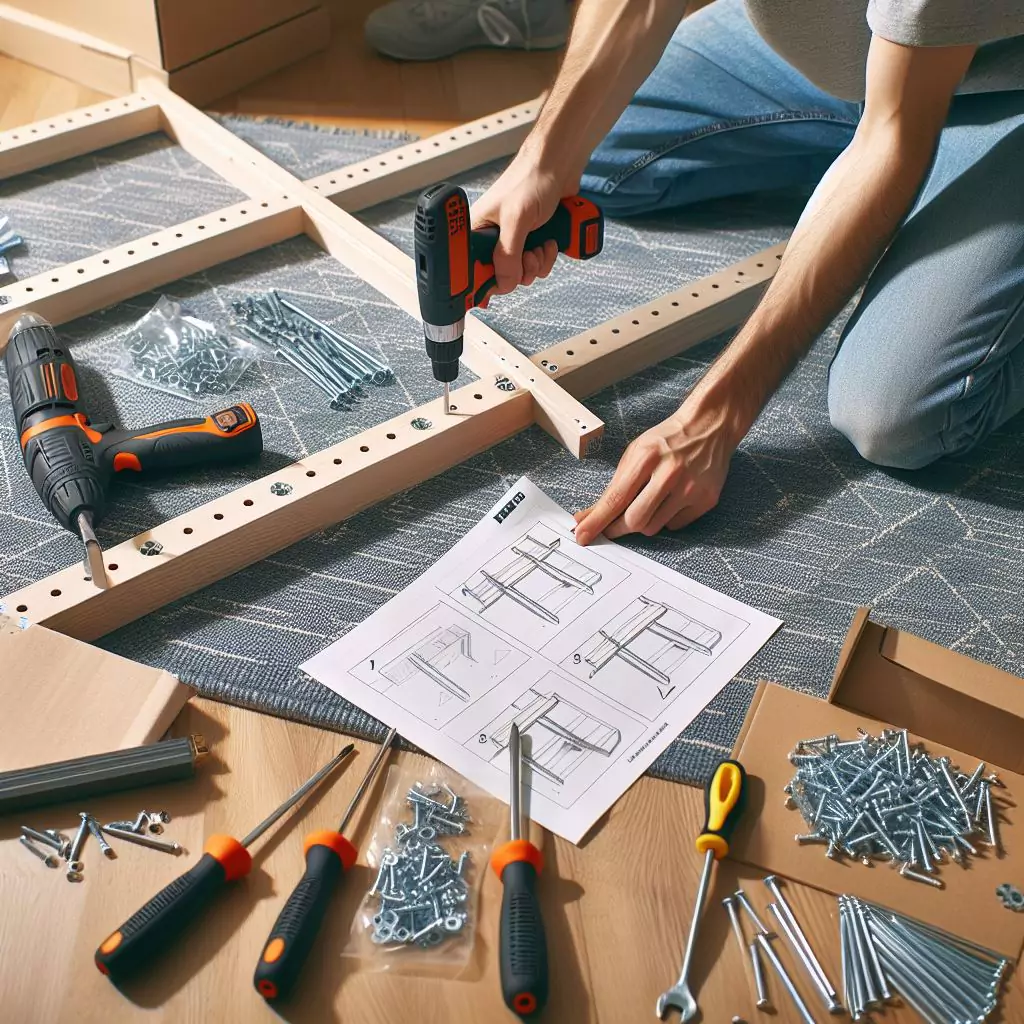
3. Assembling Flat-Pack Furniture
Whenever you’ve finished unpacking your brand-new piece of flat-pack furniture. It resembles a huge jigsaw puzzle that has to be completed. But don’t panic; we’re here to help you sort out the bits. Let’s take this step by step:
Here is how to assemble flat-pack furniture:
How To Assemble Flat-Pack Furniture?
Master the art of assembling flat-pack furniture with ease! Our step-by-step guide empowers you to turn those confusing pieces into functional home treasures. 🛋️✨

8 Steps guide to assembling flat-pack furniture:
Alright, the Avengers start assembling! Open the package slowly, then spread out the parts in a clear, uncluttered area. You can see the broader picture by doing this, much as when you lay out the parts of a jigsaw puzzle.
There’s still more, though! Make sure you have everything you need. There should be no missing or misplaced parts, including all of the screws and nuts. Verify it once again with the components list in the user guide. You do not want to realise you are missing a piece of the puzzle halfway through.

Reading the instructions is the section where many people get stuck. It’s like having your puzzle guidebook with you at all times, directing you in every move. So, take your time and properly study the directions. Recognise the assembly procedures and pay attention to any cautions or safety recommendations. They function on this journey like your road markers.
Pay close attention to any symbols or diagrams as you read. These act as treasure maps by indicating the sort of hardware you should use and the direction in which the screws should be turned. Most essential, get familiar with the labels and pieces so you don’t get lost later.
We’re organising it right now! Put comparable furniture pieces together in a group, much as you would a set of puzzle pieces. This makes finding what you need as you go much easier. Keep screws and other tiny hardware labelled per the instructions and store them in resealable bags or containers. You’ll spend much less time looking for the perfect piece if you do this, I promise.
Ready to begin assembling everything? Start with the furniture’s foundation or frame. These are often the more substantial structural elements. Make tight connections by securing them in place using the tools at your disposal. Additionally, keep an eye out for alignment; after all, no one wants a misaligned jigsaw piece.
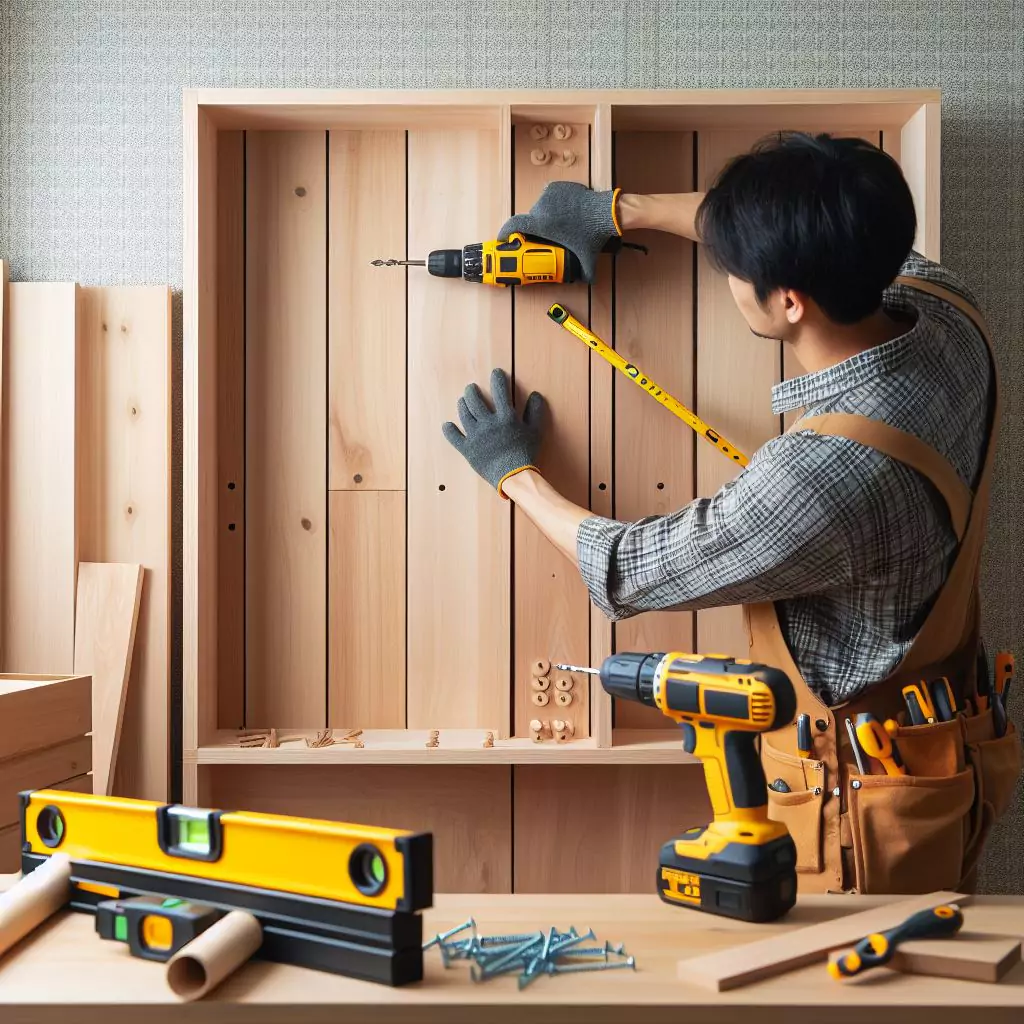
Once your foundation is set up, follow the directions to install panels, shelves, or side pieces. Here, exercise additional caution. Verify that everything is aligned properly and that the hardware fits into any holes that have already been bored. You want your puzzle to seem complete with no parts missing.
The challenge becomes more intriguing if your flat-pack furniture has drawers, doors, or any other moving pieces. Follow the directions while assembling and attaching them. Verify that doors open and close without any obstructions, and that drawers move smoothly. transitions that flow seamlessly, much like jigsaw parts.

Here’s a valuable piece of advice – never skip the double-check! Go back and inspect all the connections, making sure they’re tight and secure. It’s like making sure your puzzle pieces are snugly in place. Use your level to ensure your furniture is stable and sits flat on the floor. No wobbling allowed.
And now for the big finish! Put your constructed furniture in its allotted location and enjoy the sense of accomplishment you feel. You’ve finished assembling some furniture yourself!
Wow, good job! You just completed the assembly of flat-pack furniture like a master. But what’s this? We’ve only just begun our adventure. When working with goods that employ various assembly techniques including hardware like cam locks and dowels or even glueing and attaching components, furniture assembly can become more complicated. Let’s take a look at that area.
Read more > Your Furniture Deserves the Best Paint: Learn How Here!
4. Assembling Furniture with Hardware
Now that you’ve mastered a 2D problem, you may go on to a 3D challenge. When working with furniture that needs screws, bolts, nuts, and washers to connect various components, it is similar to that. Even if it’s a little trickier, you can do this!
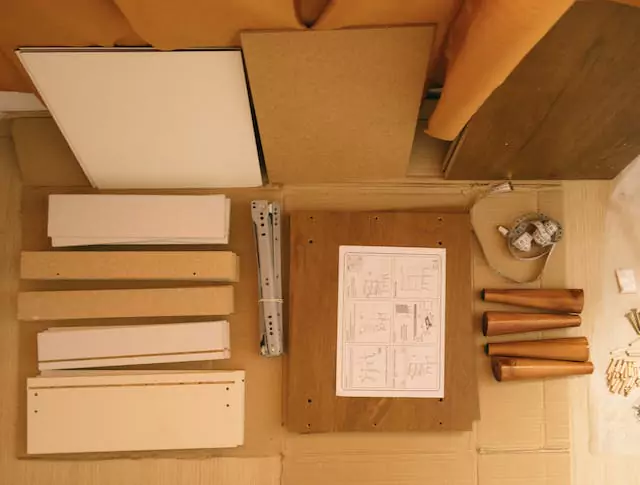
Step 1 Unbox and Check Parts
Like previously, take your furniture pieces out of the box and arrange them. Then, carefully examine every piece of hardware, including screws, bolts, nuts, washers, and more. Cross-check your supplies with the components list in the instruction manual to make sure you have everything. Our 3D puzzle has all the components, right?
Step 2 Read the Instructions
It’s time to read the handbook again. To comprehend the processes and any safety precautions, carefully read the assembly instructions. You don’t want to overlook any of the crucial particulars in this 3D puzzle. Pay attention to the symbols and illustrations that demonstrate the proper usage of hardware and how to assemble items. Learn about the labels and pieces as well.
Step 3 Arrange and Organize Parts
As usual, being organised is key. For simple access, group related components together. Small hardware, such as screws and bolts, should be kept in marked bags or containers for easy access.
Step 4 Start with the Base or Frame
Once more, start with the foundation or frame and proceed as directed. Use your tools to tightly tighten screws and bolts because you’re working with larger components. It’s similar to creating the framework for your 3D puzzle.
Step 5 Attach Panels and Shelves
Follow the directions for attaching panels, shelves, or side pieces. Make sure everything is correctly aligned so that it seems like the 3D elements are harmoniously fitting together. Verify if the building is level and stable with a level.
Step 6 Secure Moving Parts
If your furniture includes drawers, doors, or other moving parts, it’s time to assemble and attach them. You need to double-check that drawers slide smoothly and doors open and close without any issues.
Step 7 Use the Right Hardware
Keep a strict eye on the size, type, and screw specifications provided in the instructions. Your furniture’s stability and toughness might be compromised if the incorrect hardware is used. Not too loose, not too tight—tighten them to the appropriate torque.
Step 8 Double-Check and Adjust
Go back and double-check everything. Ensure that all connections are tight and secure. Use your trust level to confirm stability. Just like solving a 3D puzzle, everything needs to fit perfectly.
Step 9: Final Inspection
Before you call it a day, inspect your assembled furniture one last time. Look for missing parts or potential issues, like loose screws or uneven components. Test the drawers, doors, and other moving parts to guarantee they work correctly.
Step 10: Clean Up
When you’re finished and happy with your job, it’s time to organise your workstation. Organise all leftover hardware and throw away any packaging materials. As neat and orderly as the completed piece, your workstation should be.
Step 11: Enjoy Your Furniture
There it is—a piece of furniture you put together with your own two hands. Place it where you planned, and enjoy your sense of accomplishment after finishing the 3D puzzle.
You’ve now mastered hardware-attached 3D puzzle furniture and flat-pack furniture, and you’re also getting the hang of both assembly methods. Well done! But our adventure is not over yet. Certain furniture items, particularly those that utilise cam locks, dowels, the use of glue, and fasteners, call for a specialised set of abilities. Let’s proceed to it now.
Read More > Measure Your Space for Furniture With 10 Easy Steps
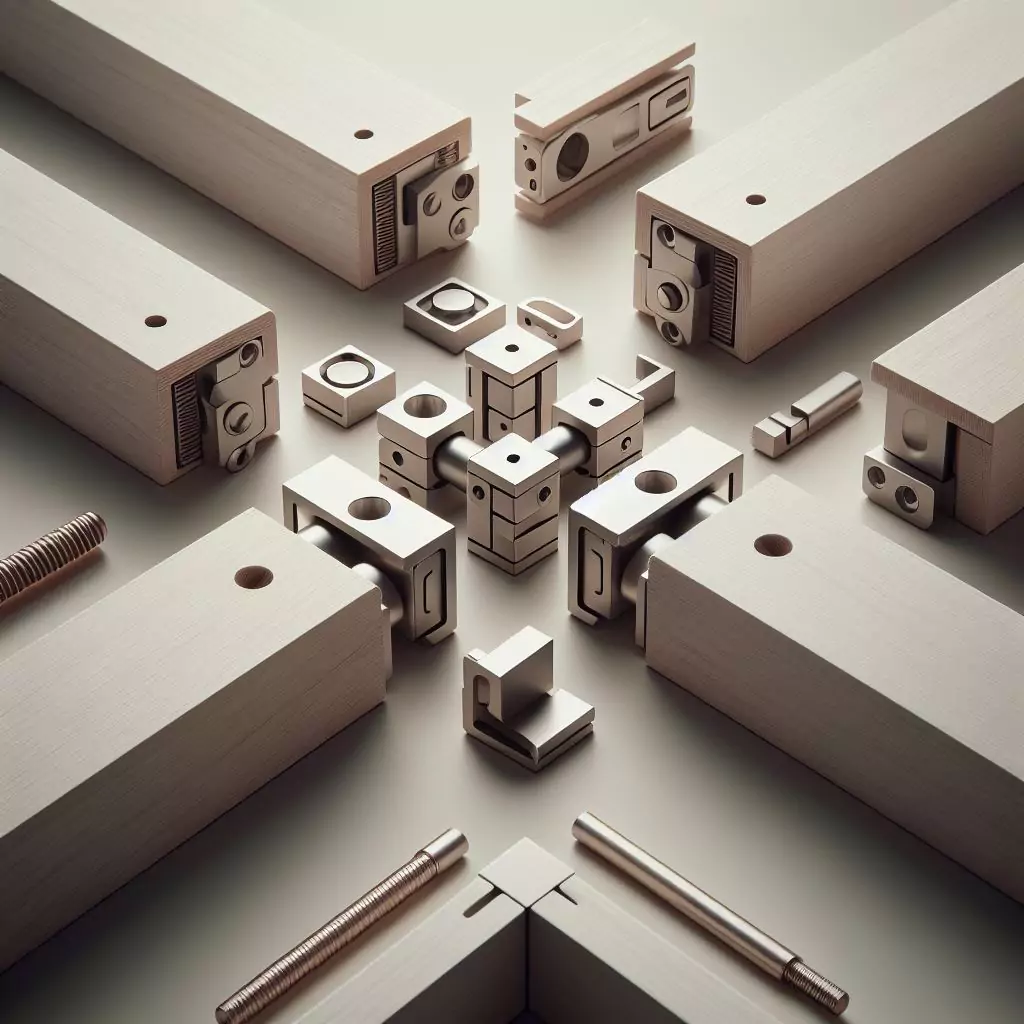
5. Dealing with Cam Locks and Dowels
We’ve now entered the domain of complicated linkages. Consider the move from puzzles to a Lego kit. Cam locks and dowels are two types of fasteners commonly used in furniture construction. They ensure secure connections and aid with the alignment of components for a professional finish.
Understanding Cam Locks
Cam locks are cylindrical locks that secure components by turning a screw or cam. They’re often used to join panels, like the sides of cabinets or bookshelves.
Understanding Dowels
Dowels are wooden or metal pegs that fit into pre-drilled holes in furniture components. They help align parts and provide stability.
6. Proper Techniques for Secure Assembly
To work with cam locks and dowels, follow these techniques:
1. Pre-Assembly Preparation
Get all your components ready according to the instruction manual. Leave the cam locks and dowels for the final assembly step.
2. Align Components
Position the components that need to be connected. Ensure that the cam lock holes and dowel holes align correctly.
3. Insert Cam Locks
Pop those cam locks into their corresponding holes. They usually have arrows or markings showing which way to turn them. Use a screwdriver and turn the cam lock in the right direction, not too tight – we’re talking snug but not overtightened. Overtightening can damage the wood.
4. Insert Dowels
Put those dowels into their pre-drilled holes. If the instructions recommend it, apply a bit of wood glue to strengthen the connection. Trust me; this extra step will keep your furniture together like the perfect Lego set.
5. Connect Components
Slide the components together. The cam locks and dowels should align, creating a tight and secure fit.
6. Final Inspection
Make sure all connections are secure and snug. Use your trusty level to check for alignment and stability.
7. Clean Up
Get rid of any packaging materials and organize the remaining hardware. Think of it as tidying up your Lego pieces after finishing a cool structure.
By following these techniques, you’ll create solid connections, like snapping together Lego bricks, and
achieve a professional finish.
7. Furniture with Drawers and Slides
Now, let’s dive into a bit more complexity – assembling furniture with drawers and slides. Drawers provide valuable storage space, and their assembly can be a bit trickier. But don’t worry; we’ll break it down for you.
7.1 Assembling Drawers
1. Assemble the various drawer components (front panel, rear panel, and sides) according to the assembly instructions. Dowels, screws, and wood glue may be required to bind the components together, depending on the design.
2. Ensure the corners of the drawers are square and all connections are tight. Nobody wants a lopsided drawer, right?
7.2 Installing Drawer Slides
Drawer slides are hardware components that make your drawers slide smoothly in and out. Let’s learn how to install them properly:
1. Identify the locations where the drawer slides should be installed within the furniture. Your trusty instruction manual will guide you on this.
2. Attach the drawer slides to the inside of the furniture frame or cabinet using screws. Ensure that the slides are level and aligned with each other.
3. Mount the other part of the drawer and slide it onto the sides of the drawer. This should correspond to the installation of the slides on the furniture. Make sure they’re correctly aligned.
4. Test the drawer to ensure it glides in and out smoothly, without any obstructions. Like a well-oiled machine, but without the oil.
5. If necessary, fine-tune the position of the drawer slides to achieve a perfect fit. Think of this as getting your drawer to slide like a dream.
So, there you have it. Assembling furniture with drawers and slides, it’s a bit like solving a multi-step puzzle, but a rewarding one when you get it right.
8. Securing Shelves and Panels
Shelves and panels play a crucial role in the structure and appearance of your furniture. To ensure they are secure and properly attached, follow these steps:
8.1 Attaching Shelves
1. Locate the pre-drilled holes or brackets for the shelves within the furniture frame. Your instruction manual will be your guide, just like the key to solving a puzzle.
2. Insert wooden dowels or screws, as specified in the instructions, into these holes or brackets. These are like the missing pieces that complete the puzzle.
3. Place the shelf on top of the dowels or brackets, ensuring it rests securely.
4. For added stability, you can use screws to attach the shelf to the furniture frame from below, if the design allows for it. This is like adding support beams to your puzzle structure.
5. Ensure that the shelf is level and correctly aligned. No crooked bookshelves here; we’re aiming for perfection.
8.2 Attaching Back Panels
If your furniture piece includes a back panel, here’s how to attach it securely:
1. Identify the pre-drilled holes or brackets for the back panel within the furniture frame.
2. Insert screws or dowels into these holes or brackets. They’re like the corner pieces of a puzzle, crucial for stability.
3. Place the back panel on top of the screws or dowels.
4. Secure the back panel by tightening the screws or ensuring that the dowels fit snugly into their holes.
5. Check that the back panel is properly aligned, with no gaps or misalignments. It should look seamless, just like a well-constructed puzzle.
These steps will help you attach shelves and panels, giving your furniture piece more storage space and structural support. Ensuring that every puzzle piece fits precisely is the key.
9. Assembling Complex Furniture
It’s time to graduate from putting together little puzzles to working on a 3D puzzle with a lot of components. Beds, closets, and huge entertainment centres are examples of complex furniture components that might be more difficult to assemble. But don’t worry; the key is to go cautiously.
Step 1: Unbox and Check Parts
As you would with simpler furniture, remove the packing and arrange all the parts on a clean table. In a sense, you’re laying the foundation for your larger puzzle.
Make sure you have all the required hardware, fasteners, and parts. To make sure nothing is missing, see the components list in the instruction manual. A component missing from your intricate puzzle is the very last thing you need.
Step 2: Read the Instructions
It’s time to go over your handbook like you would a large puzzle blueprint. Read the instruction booklet thoroughly to comprehend the assembly procedures and any safety recommendations or cautions.
Step 3: Arrange and Organize Parts
Organise and group comparable parts together for easy access during assembly. Place screws, bolts, and tiny hardware in resealable bags or containers and name them accordingly.
Step 4: Start with the Base or Frame
Following the directions for this section, start with the furniture’s foundation or frame. Usually, this entails joining more substantial structural elements. Like assembling the sides and edges of your puzzle first, building a strong base.
To properly tighten screws and nuts, use the proper tools. Use a level to check for any unevenness and make sure that all connections are straight and level. It’s similar to ensuring sure your puzzle’s edges are straight and aligned with one another.
Step 5: Attach Panels and Shelves
After that, attach the panels, shelves, or side pieces in the manner prescribed by the instructions. Make sure the pre-drilled holes match the hardware and that these components are properly aligned. It all comes down to putting the jigsaw pieces together.
Step 6: Secure Moving Parts
If your furniture has moving parts like doors, drawers, or other components, assemble and attach them according to the directions. Confirm that drawers move easily and that doors open and close without being obstructed.
Step 7: Assemble Additional Components
It’s time to work on any extra parts that are unique to the piece of furniture, such as headboards or footboards for a bed. Apply the available hardware to the published instructions for assembly for each component.
Step 8: Final Inspection
Make sure all connections are snug and secure by rechecking them. Make sure the furniture is sturdy and flat on the floor by using a level.
Step 9: Clean Up
After the assembly is complete to your satisfaction, dust up your workplace by throwing away any package materials and arranging any leftover hardware.
Step 10: Enjoy Your Complex Furniture
And now for the big finish! Place your intricate furniture that has been constructed in the correct location, then bask in the thrill of solving your 3D puzzle. It’s like standing back to take in your completed work of art.
While assembling sophisticated furniture might be a little more difficult, it is still possible with the correct equipment, patience, and a systematic approach.
10. Handling Glass and Mirrors
Glass and mirrors enhance the beauty and usefulness of furniture items, but handling them demands particular attention to avoid mishaps and damage. Let’s discuss how to do it.
10.1 Precautions for Handling Glass and Mirrors
- Clean Surface: Place the glass or mirror on a clean, flat, and padded surface. Avoid hard or uneven surfaces that could cause breakage.
- Secure Surroundings: Make sure there are no obstructions around and that nobody will be standing close to the glass or mirror while it is being handled. It is comparable to setting up a safe area around your puzzle table to prevent any mishaps.
- Careful Lifting: Be mindful to grab the edges rather than the middle while lifting the glass or mirror. To reduce the danger of damage, lift objects using the right procedures. It’s similar to protecting a fragile puzzle piece by grasping its edges.
10.2 Properly Attaching Glass and Mirrors
- Mounting Hardware: Mounting glass or mirrors requires following the assembly instructions. Usually, special brackets or clips are required to keep these materials firmly in position. It’s like connecting your puzzle pieces using the right connections.
- Use of Adhesives: Adhesives may occasionally be used to secure mirrors or glass. Apply the glue according to the directions, then spread it out evenly. Imagine applying glue to your jigsaw to secure a specific piece, spreading it out evenly.
- Check Alignment: Verify that the glass or mirror is correctly aligned and level after attachment, just like ensuring that a particular piece in your puzzle fits perfectly. Use a level to guarantee accuracy.
- Safety Measures: To guarantee stability and prevent accidents, firmly fasten any safety hardware that has been provided, such as anti-tip brackets. To keep things secure, it’s like putting more safety locks on your puzzle.
You can handle glass and mirrors during furniture construction safely and securely by adhering to them using these precautions and attachment methods.
11. Adjusting and Fine-Tuning
Even after finishing the first assembly, some tweaks and fine-tuning may be required to get a flawless fit and finish. Let us now discuss how to do this.
11.1 Ensuring Proper Alignment
1. Check that the furniture is sturdy and rests flat on the floor using a level. Similar to making sure your puzzle rests level on the table, adjust the furniture’s legs or feet as necessary to create stability.
2. Look that all components are properly aligned. To provide a uniform and professional appearance, adjust any misaligned elements. It’s similar to ensuring that all of the jigsaw pieces fit together perfectly.
11.2 Drawer and Door Adjustments
1. If drawers or doors are not closing smoothly or are misaligned, make the necessary adjustments. Just like ensuring that the moving parts in your puzzle work smoothly.
2. For drawers, check the drawer slides for obstructions or misalignments. Adjust the slides, ensuring they run smoothly, and that the drawer sits level.
3. For doors, check the hinges or mounting hardware. Make adjustments to ensure the doors open and close without issues, just like fine-tuning the pieces of your puzzle so they slide together perfectly.
11.3 Tightening and Lubrication
1. Check all screws and bolts to ensure they are securely tightened. If any are loose, use the appropriate tools to snugly fasten them, like making sure that all the pieces in your puzzle are tightly connected.
2. If moving parts are squeaking or difficult to move, consider using a silicone-based lubricant to improve their functionality. It’s like oiling the gears in your puzzle to make them work smoothly.
By thoroughly inspecting and making these adjustments, you can achieve a professional finish and ensure the long-term durability of your assembled furniture. It’s like going through the final steps of your puzzle, making sure everything is perfect before you admire the completed picture.
12. Troubleshooting and Common Issues
During furniture assembly, you may encounter common issues that require troubleshooting. Let’s discuss solutions to some of these issues:
12.1 Misaligned Holes
-If the holes do not line up, do not force the components together. Disassemble and reassemble your work to ensure that all pieces are properly aligned. Consider it like going back to your puzzle and rearranging the pieces that don’t fit.
12.2 Missing Parts
– Contact the manufacturer or reseller for replacements if you find any missing components. Avoid attempting to swap pieces since doing so might jeopardise the furniture’s structural integrity. It’s similar to receiving a new puzzle piece when one is missing.
12.3 Tightening Screws
– Screws should not be overtightened since this might strip the holes or harm the wood. Use the right equipment and the directions to guarantee a tight fit without overtightening.
12.4 Swapped Components
– Don’t worry if you unintentionally exchange components; it happens to many people. Simply go back and reassemble the pieces as directed to fix the mistake. It’s similar to correcting a puzzle piece after realising you put it in the wrong position.
12.5 Sticky Drawers or Doors
– Make sure there are no obstacles or misalignments if drawers or doors don’t glide or close smoothly. Make the required changes to make sure they work properly. It’s similar to making sure that your moving puzzle parts fit together smoothly.
You can guarantee a simple and effective procedure of furniture installation by taking care of these frequent problems as they come up.
13. Safety Considerations
While assembling furniture, safety should be a top priority. Let’s go over some safety considerations to keep in mind:
13.1 Proper Lifting Techniques
– Use correct lifting procedures while handling big furniture parts or pieces to prevent strain or damage. If necessary, ask for assistance and lift with your legs rather than your back. It’s similar to being careful not to strain oneself when moving large puzzle pieces.
13.2 Avoid Strain
– Avoid overexertion and strain. Take breaks if the assembly process is time-consuming or physically demanding. Just like taking breaks during your puzzle-solving sessions.
13.3 Protect Your Eyes
– Wear safety goggles when using tools, especially hammers and screwdrivers, to shield your eyes from flying debris or unintentional falls. It’s similar to donning safety glasses when working on a puzzle to prevent eye pokes.
13.4 Protect Your Hands
– Use work gloves to protect your hands from sharp edges, splinters, or rough surfaces. It’s like wearing gloves while handling your puzzle pieces to avoid any cuts.
13.5 Use Tools Safely
– Handle tools with care and follow the manufacturer’s safety recommendations. Keep tools in good condition to prevent accidents, just like using your puzzle pieces carefully to avoid damaging them.
With these safety considerations in mind, you can confidently complete your furniture assembly projects without harm.
14. Caring for Your Assembled Furniture
Once your furniture is put together, it is essential to give it the right maintenance so that it lasts for a very long time and serves you well. Here are some pointers for taking good care of and preserving your furniture:
14.1 Regular Cleaning
– Dust and clean your furniture regularly to prevent dirt buildup. Use a soft cloth, microfiber cloth, or a feather duster to avoid scratching the surface.
14.2 Avoid Direct Sunlight
– Keep your furniture out of direct sunlight to prevent fading or discolouration, just like keeping your completed puzzle out of the sun to maintain its colours.
14.3 Use Coasters and Mats
– Use coasters and placemats under glasses, cups, and hot items to protect the furniture’s surface from damage. Think of them as protective covers for your puzzle pieces.
14.4 Protect from Scratches
– Avoid dragging heavy or sharp objects across the furniture to prevent scratches. Be gentle and cautious, treating it as you would with delicate puzzle pieces.
14.5 Tighten Fasteners
– Periodically check and tighten screws, bolts, and nuts to ensure the furniture remains stable and secure. Just like revisiting your puzzle to ensure all pieces are tightly connected.
14.6 Consider Seasonal Changes
– With variations in humidity, wood furniture can expand or compress. Maintain a steady climate for your furniture to prevent warping or cracking problems.
You can improve the longevity and maintain the brand-new appearance of your built furniture by taking proper care of it. It’s similar to storing your finished puzzle so you may enjoy it in the future.
Wrapping Up
Congratulations on finishing this in-depth guide on furniture assembly best practices! Different assembly methods, tools, and safety issues have all been covered. We’ve covered flat-pack furniture, using various hardware types, handling mirrors and glass, making adjustments, troubleshooting typical problems, and maintaining your built furniture.
Keep in mind that building furniture is a talent that gets better with practice. You’ll become more certain and skilled the more assignments you take on. Consider it expanding your skill level in the field of furniture assembling.
You’ll thus be ready to handle that DIY furniture project with ease the next time you unpack it. It’s similar to an experienced puzzle solver taking on a new task since you have the information and abilities necessary to finish the picture.
I appreciate you joining me in this discussion about furniture assembly, and I hope your future DIY home repair endeavours are successful. Enjoy your building!

Pingback: Your Furniture Deserves the Best Paint: Learn How Here! - Wow Home Shop
Pingback: How to Make Furniture Pads in 5 Minutes - Wow Home Shop